
Nexus 7 First Gen (2012) – Flashing Lollipop Factory image
I got tired of waiting for Android Lollipop to become available for my Nexus 7 (2012) so decided to grab the factory image and flash it myself. I was pleasantly surprised at how easy this was to accomplish and so far I have not had any issues with Android 5.0. I even dare say that it seems faster than KitKat 4.4.4. I will run a Geekbench on it at some point.
First I downloaded the Android SDK and unzipped it to the root of my D: drive. I chose this location because it has been my experience that the folders run a bit deep and Windows Explorer will eventually bomb out on copying files. Unzipping to the root folder keeps the character count and folder names to a minimum.
Installing Google USB Driver
Once unzipped, I ran the SDK Manager under the root of the adt-bundle-windows-x86_64-20140702 folder, the folder name as of version currently available.
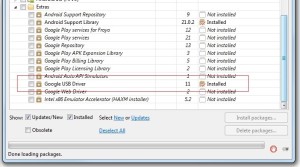
In the SDK Manager, I left what was currently checked, scrolled down to Extras, checked the box for Google USB Driver and clicked to install the packages.
When the packages were finished installing, I needed to install the Android USB driver on my system with Windows 7 Professional.
There is a guide for installing the Google USB driver on the various platforms of Windows here.
- Click on Start, right-click on Computer and select Manage.
- Select Device Manager on the left.
- On the right, under list of items under the computer name, look for Other device. It should already be expanded.
- Right-click the item name and select Update Driver. This will launch the Hardware Update Wizard.
- Select Browse my computer for driver software and click Next.
- Click Browse and navigate to the USB driver folder located in <sdk folder location>\extras\google\usb_driver\.) As an example, for me it was D:\adt-bundle-windows-x86_64-20140702\sdk\extras\google\usb_driver.
- Click Next to install the driver.
- I rebooted the system but don’t know that I exactly needed to.
Next I downloaded the factory image from Android Nexus images page under Factory Images “nakasi” for Nexus 7 (Wi-Fi) and then 5.0 (LRX21P) and unzipped it to the root of my D: drive (D:\nakasi-lrx21p-factory-93daa4d3) as well.
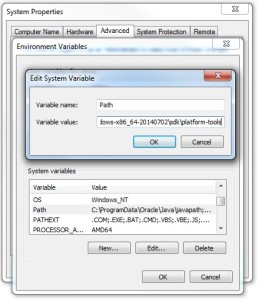
Add folder to Path System Variables
Now, I needed to start my Nexus in fastboot mode and opted to use the keys on the tablet rather than the adb tool in the Android SDK.
I know I’m going to use that tool later and opted to enter its folder location in my PATH system variable so I can run adb commands no matter what folder I was in.
I powered off my Nexus 7 and then pressed the volume up/down and power buttons at the same time until I saw the fastboot screen.
Opening a command console (CMD) as administrator on my computer I typed in the command to unlock the boot loader (This erases all data on the device):
At command line: fastboot oem unlock
I could see the confirmation on my Nexus 7 and saw the red text at lower left reflected it is now unlocked.
Next, in the command console window I navigated to the system image directory I unzipped earlier (for me D:\nakasi-lrx21p-factory-93daa4d3\nakasi-lrx21p) and typed the fast install command which started the flash process of the 5.0 image to my Nexus and waited out the process until it was done.
At command line: flash-all.bat
When the flash process is finished the command prompt will show to click any key to finish, the Nexus rebooted and I had a nice clean version of 5.0 Lollipop.
Before doing anything I re-locked the boot loader by turning off the tablet, booting to fastboot mode and from the command prompt issuing the command
At command line: fastboot oem lock
The text at the lower left confirms the lock was successful.
Resources
https://developer.android.com/sdk
https://developers.google.com/android/nexus/images
http://developer.android.com/tools/device.html
http://forum.xda-developers.com/showthread.php?t=1907796